Home EV Charger Guide: Costs, Installation, and What to Know Before You Buy
Choosing the right home EV charger is one of the most important decisions you will make as an EV owner, and one of the most misunderstood. The concept is simple: plug in at night and wake up to a full battery. But getting there requires understanding your electrical capacity, your daily driving needs, and the real costs involved. This guide covers everything you need to know before you buy or install a home EV charger.
Skipping an EV charger for home isn’t really an option, either. Relying on public stations quickly proves to be a time-consuming chore that strips away much of the joy of EV ownership. But the whole debate over home charging vs. public charging exists for a reason. It doesn’t take long to realize that a standard wall outlet is agonizingly slow for daily charging. A property manager evaluating charging access for tenants realizes that a single standard plug won't meet the needs of a building full of EV drivers.
For most EV owners, the answer is a Level 2 home EV charger. It delivers the speed of a public station with the convenience of charging at home. The sections below walk through costs, electrical requirements, charger selection, installation, and how to manage charging around real daily driving behavior.
Level 1 vs. Level 2 Home EV Charger: Which One Do You Actually Need?
Here is what separates Level 1 and Level 2 EV charging.
Level 1 charging uses the standard 120-volt outlets found in your home. This is the most convenient option, because it requires no special installation. If you have a garage to park your car in and it has a spare outlet, you’re set for Level 1 charging. However, that convenience comes at the cost of efficiency. Level 1 charging is significantly slower than Level 2. In most cases, it only adds three to five miles of range per hour of charging.
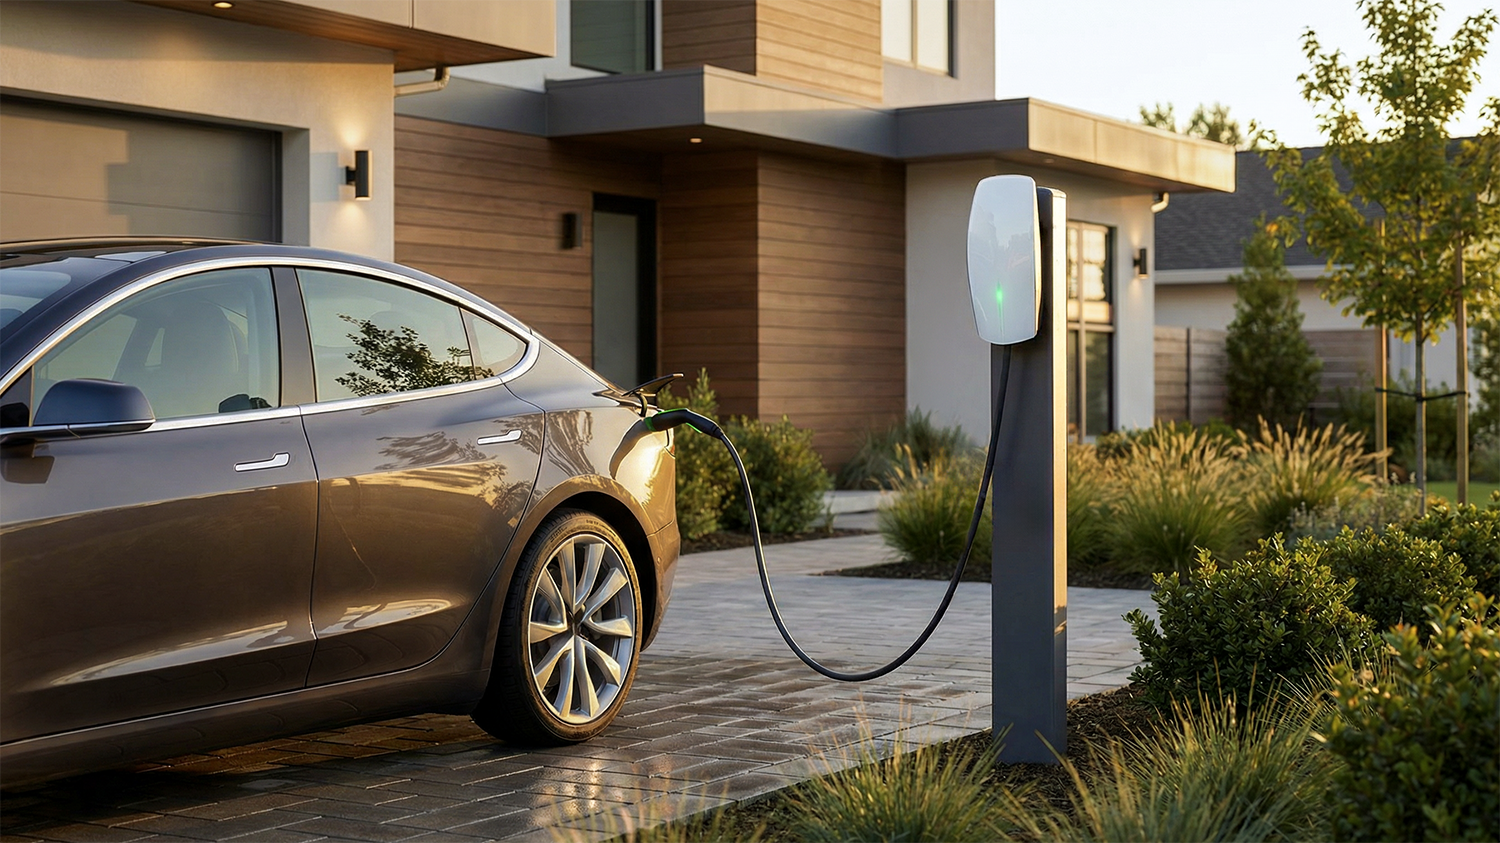
A Level 2 EV charger home setup uses a dedicated 240-volt circuit and can add 12 to 30 miles of range per hour. There are two ways to access Level 2 charging at home. The first is a hardwired installation, where the charger is permanently connected to a dedicated circuit. The second is a plug-in setup using a NEMA 14-50 outlet, which is the same 240-volt, 50-amp receptacle used by RVs and some kitchen ranges. A NEMA 14-50 outlet installation is typically less expensive than a hardwired setup and gives you the flexibility to use a portable Level 2 charger, which is an appealing option for renters or those who may move in the near future. In both theory and practice, the performance difference between Level 1 and Level 2 charging is substantial.
Consider a commuter who drives 40 miles round-trip daily. On a Level 1 charger, it may take 10 to 13 hours to replenish those 40 miles. If you get home at 7 PM and leave at 6 AM, a Level 1 charger can barely keep up with your normal schedule, much less any extra driving.
In real-world scenarios, Level 1 is rarely sufficient for anything beyond minimal daily driving. For the vast majority of EV owners, a Level 2 home EV charger is the practical standard. It ensures the vehicle is fully charged every morning without requiring any adjustment to a normal overnight routine.
Home EV Charger Electrical Requirements: What Your Panel Needs to Support
The total cost of a Level 2 home EV charger setup has two components: the hardware and the electrical installation. These must be evaluated separately, because the installation cost varies far more than the hardware cost and depends entirely on your home's existing electrical capacity.
The Level 2 charging unit can run anywhere from $400 to $800. Some advanced smart chargers can cost up to $1,200. While that’s quite a wide range, the installation cost is even more variable. If you have an electrical panel in your garage and your home has ample electrical capacity, a straightforward Level 2 charger installation might cost between $500 and $800.
If your home requires electrical upgrades or has more complex infrastructure, installation costs can range from $2,000 to $4,000. A panel upgrade alone can account for the majority of that cost. Complex installations also typically require permits and inspections, which add both time and expense to the project.
Ultimately, there is no one-size-fits-all pricing for a Level 2 EV charger home installation. You will have to do your homework and, more than likely, have a qualified electrician give you an estimate.
How to Choose the Best Home EV Charger for Your Needs
The best Level 2 home EV charger is the one that matches your actual driving needs, your home's electrical capacity, and your budget. There is no universal answer, but evaluating a few key factors will point you toward the right choice.
Key factors include charging speed, which is determined by the charger’s amperage rating. A 32-amp charger will be sufficient for most daily drivers, but a 48-amp version is ideal for those with long commutes or large-battery electric trucks.
You also need to decide whether a smart charger is worth the investment, or whether a standard charger will meet your needs. Smart models connect to Wi-Fi, allowing you to monitor usage, schedule charging during off-peak utility rates, and integrate with other smart home systems which are all nice features, but not necessarily required for most EV owners.
If you live in a multi-EV household, smart chargers might make more sense. Rather than upgrading the home panel to support two massive 50-amp circuits, you could choose two smart chargers capable of power sharing, which allows both cars to charge simultaneously on a single circuit without tripping the breaker.
Whichever home EV charger you choose, the goal is for it to seamlessly support how you (and any other EV owners in your home) actually live and drive.
Where Installation Goes Wrong and How to Avoid It
If you’re thinking about a DIY installation to save costs, think again. Installing an EV charger at home is not a weekend project for hobbyists. Any mistakes can lead to significant financial loss and severe safety hazards.
The most frequent error is underestimating electrical requirements, which leads to overloaded panels and tripped breakers. Another common mistake is poor charger placement. The charging cables typically run 18 to 25 feet long. If you install the charger on the back wall of a garage without considering that a specific EV's charge port is on the rear driver's side, you may be unable to plug the car in without pulling in backward every day.
Finally, don’t skip obtaining permits or hire an uncertified handyman instead of a licensed electrician. These “cost savings” can void your homeowners' insurance or your vehicle's warranty, costing you much more in the long run if something should go wrong.
How Home Charging Fits Into Daily Driving Behavior
A successful home EV charging setup aligns the hardware with your actual daily usage patterns. The goal is a routine so frictionless that plugging in feels like second nature. The right starting point is an honest assessment of how often you actually need to charge.
While some drivers prefer an always-plugged-in approach, many drivers with long-range vehicles and short commutes find they only need to charge once or twice a week.
Charging setups should be able to adapt to shifting daily routines. A family sharing a single Level 2 charger between two EVs must manage their hardware strategically. One driver might charge on Monday and Wednesday nights, while the other takes Tuesday and Thursday.
For fleet managers with take-home vehicles, the goal is reliable overnight charging that ensures vehicles are road-ready at the start of every shift. The hardware should support that outcome without requiring employees to manage complex schedules. A clear policy paired with the right Level 2 charger is the most reliable solution.
Home EV Charging for Renters and Property Managers
Homeowners have the clearest path to a Level 2 home EV charger installation. Renters and property managers face a different set of constraints, but practical options exist for both groups.
For renters, the first step is a direct conversation with your landlord or property manager. Many states now have right-to-charge laws that give tenants the legal right to request EV charging access, though the specifics vary by location. If you rent a single-family home with a private garage, a portable Level 2 charger that plugs into a NEMA 14-50 outlet may be a practical middle ground that avoids permanent installation.
For property managers, the calculus is different. Installing shared Level 2 charging stations in a parking structure or lot is increasingly a competitive amenity, particularly in urban markets. Multi-unit dwelling (MUD) charging solutions are available that allow multiple tenants to charge from a single power source using load management, which keeps electrical infrastructure costs manageable. Consulting with a licensed electrician who specializes in commercial EV infrastructure is the right starting point.
How to Install a Home EV Charger: A Step-by-Step Planning Guide
The following seven steps cover everything needed to plan and complete a Level 2 home EV charger installation:
- Evaluate your daily driving needs: Calculate your average daily mileage to determine the charging speed you actually need. This prevents you from spending more for electrical potential you never use.
- Check your electrical panel capacity: Have a licensed electrician calculate the load on your existing breaker box. This will help you get a handle on the installation costs ahead of time and better shape your project budget.
- Choose the charger: Select a Level 2 charger that matches both your actual vehicle usage and your home's capacity. Don’t buy more or less than what you truly need.
- Get quotes from multiple electricians: Solicit at least three bids from licensed professionals who are experienced with EV charging installations.
- Obtain permits (if required): If your installation crosses the line from simple to complex, ensure the electrician you choose obtains the necessary local permits before work begins.
- Schedule the installation: Coordinate the installation date, keeping in mind that panel upgrades may require the utility company's involvement and may mean your home is without power for a period of time.
- Test and optimize placement: Park your car in its usual spot to determine exactly where to mount the charger and cable holder for maximum convenience.
Two additional recommendations: prioritize reliability and build quality over advanced features you may never use, and choose a high-amperage option if you anticipate adding a second EV or upgrading to a larger vehicle in the future.
Installation Mistakes to Avoid
If you follow the seven-step plan above, you should have the perfect Level 2 EV charger home setup. However, you can still make mistakes along the way. Avoid these traps:
- Buying the charging hardware before verifying that your electrical panel can support it.
- Ignoring logistical issues, such as cable reach and garage door clearance.
- Choosing an electrician based on their low bid, rather than on expertise and credentials.
How a GPS Tracker Helps You Optimize Home EV Charging
A reliable charger solves the hardware problem, but hardware alone cannot tell you when to charge. That requires visibility into how the vehicle is actually being used. Trip history, daily mileage, and driving patterns are the data points that turn a reactive charging habit into a deliberate, optimized routine. For multi-vehicle households and fleet managers overseeing take-home vehicles, this kind of real-time visibility removes the guesswork entirely.
Bouncie's OBD-II GPS tracker plugs directly into your vehicle's OBD-II port and gives you real-time visibility into mileage, trip history, and driving patterns, which are all of the data points that inform a smarter charging routine. For individual EV owners, this means knowing exactly how many miles you drove today before deciding whether to plug in tonight. For fleet managers with take-home vehicles, it means remotely confirming that a vehicle is road-ready before the workday starts, without relying on driver self-reporting. Base your charging decisions on hard data, not guesswork.
Home EV Charger FAQs
Here are answers to questions many EV owners have about home charging:
How long does it take to charge an EV at home?
On a standard Level 1 (120V) outlet, a full charge can take 40 to 50 hours, and perhaps more. On a Level 2 (240V) home charger, a typical EV can charge from 20% to 80% in only four to six hours.
Do I need to upgrade my electrical panel?
It depends on your current panel. If you have a 100-amp panel that is already supporting an electric oven, dryer, and HVAC system, you will likely need an upgrade. But if you have a 200-amp panel, you likely have enough capacity for a dedicated Level 2 EV circuit.
What size breaker do I need for a Level 2 home EV charger?
Most Level 2 home EV chargers require a dedicated 240-volt circuit with a breaker sized at 20 percent above the charger's continuous amperage draw. A 32-amp charger requires a 40-amp breaker. A 48-amp charger requires a 60-amp breaker. Your electrician will confirm the correct sizing based on your specific charger and panel configuration.
Can I install a home EV charger myself?
Technically yes, but it is not recommended for most homeowners. Level 2 charger installation involves a dedicated 240-volt circuit, which carries real risk of electrical shock, fire, or panel damage if wired incorrectly. Most municipalities also require a permit and a licensed electrician for this type of work. A DIY installation that bypasses these requirements can void your homeowners' insurance and, in some cases, your vehicle's warranty. The cost of hiring a licensed professional is almost always worth it.
Can I install a home EV charger outdoors?
Yes, as long as you purchase a charger with a NEMA 4 or NEMA 4X weather-resistance rating. It must also be hardwired or plugged into a weather-protected outdoor receptacle.
Is a smart home EV charger worth it?
For most daily drivers, a standard Level 2 charger is sufficient. Smart chargers add value if you want to schedule charging during off-peak utility hours, share power across two EVs on a single circuit, or integrate with a home energy management system.
From Charging Anxiety to Everyday Convenience
A well-planned home EV charger setup eliminates the two biggest frustrations of EV ownership: range anxiety and dependence on public charging. By understanding your electrical capacity, budgeting for true installation costs, and choosing a charger that matches how you actually drive, you create a charging routine that works every day without effort.
Bouncie's OBD-II GPS tracker gives EV owners and fleet managers the real-world vehicle data needed to make every charging decision with confidence. Explore how Bouncie supports smarter EV management.